When Sephora first opened in KL, I went in for a stroll as well as to drool over the much-raved Urban Decay products, among many others. While I was really excited to see so many new cosmetic and skincare brands entering Malaysia, I was more than a little daunted by their price tags. Sephora's house brand range was pretty huge as well, including their nail polish collection. Moving closer to the display rack, this particular item caught my eye...
And it was a staggering RM35!!
(Well, give or take a few MYR; I can't remember the exact price.)
It's just a bottle of dip-in nail polish remover! If you haven't seen or heard about these before, nail polish remover dips are basically wide-mouthed plastic containers which have a piece of foam/sponge soaked in nail polish remover liquid inside. You dip your finger into the container, leave it there for about 20 seconds and your nail comes out with all the nail polish gone. Dip 'n done, eh?
Anyway, long story short, I was
so disgusted amazed at the ridiculous price, because I have been using the exact same thing (different brand, of course) bought from Daiso since 3 years back. And as you know, stuff from Daiso is only RM5. =/
 |
| Ellefar Nail Kiss - nail polish remover dip |
This, ladies and gentlemen, is my solution to pesky nail polish removal since 2008! At first they were super easy to find in Daiso around my place, but then their stocks started getting lower, and lower, until finally I couldn't find them anywhere. T__T The last time I saw them in stock, I practically grabbed half a dozen and threw them into my shopping basket without another thought. O__O
Alright, sorry for rambling on with the background story. ^^;; Today's post is about a
Do-It-Yourself "How to make your own nail polish remover dip", so let's get on with the step-by-step pictures! :)
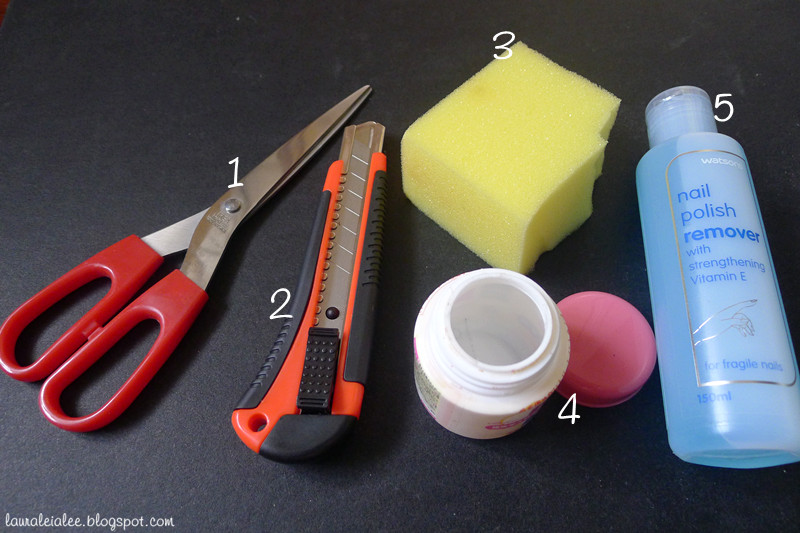
First, you'll need to prepare some items.
1. Scissors
2. Craft blade (if you don't have one, you can just use the scissors)
3. Piece of sponge (I use those that people use to wash cars, they're dirt cheap and you can use them lots of times)
4. Plastic container with wide mouth (make sure it's not too deep and your finger can dip inside)
5. Nail polish remover liquid (drugstore brands, your fave strawberry scented ones, etc)
Next, using the base or cover of the container as a guide, roughly measure and cut out a square piece of the sponge. It's okay if the sides are a bit rough, since it can be easily squeezed into the container.
You should get something that looks like this.
Now use the craft blade (or scissors) to cut a slit in the middle of the sponge. This is so that your finger can dip inside and be fully covered by the nail polish remover. For more stubborn nail polish or glitter particles, you can rub your nail against the sponge to remove them more effectively.
Hang in there, we're almost done! :)
It's time to stuff the sponge inside the container! Don't worry if it's a little too big; as long as you've cut it more or less according to the container's size, it should be able to fit in. (In fact, it's better if it's slightly bigger.) The sponge will shrink and become much softer after being soaked in the liquid.
Final step - pour in the nail polish remover. Remember to pour it in little by little, as the dry sponge needs a few seconds to absorb the liquid. Continue pouring until you estimate it to fill about half the container. For mine, that's about 50ml (1/3 of the bottle).
 |
| Tadaa! We're all set! |
Now you can just dip your finger into the container every time you want to remove your nail polish. No need to mess with cotton pads and spilled nail polish remover! If you find the sponge is getting dirty, just repeat the process, which should take less than 5 minutes. :D
Hope you found this step-by-step DIY tutorial useful~ ^^
P/S: Oh, and check out this really cute animated picture by styleseeking zurich on how 'magical' this dip is, haha!


15 comments
super useful!@@ thanks! :D
wow! great!!! thanks a lot! i will do this soon! <3
will try! thanks :)
brilliant tip. will try it for my next session. but i'll need to get a small bottle for that purpose first...
Camy: You're welcome! :)
Jean: Hope you'll be a convert of the nail polish remover dip, hehe! :D
Karlene: No problem! ^^
missyblurkit: Yup, once you find the perfect container, you're all set. Worst to the worst, you can buy the Sephora one once, then re-use the container infinity number of times, lol.
Cool~ I'll make myself one!! *looking for bottles* XD
I always hate cleaning the nail polish off because sometimes it stains my fingers, eventually making me rub all fingers besides the nails. Pfft. Will give this a try next round, thanks for the tip! :D
wooah, great idea ! :D
bendan: Good luck on your search! :D
SyingK: Hehe, no problem! Glad my post could be of help. :)
Maii: Thanks maii! Try it out and let me know how it goes yea? :D
Useful tips, thanks for the sharing ^_^
Thats pretty ingenious!! Yay to saying no to overpriced junk!
And all this while I have been using cotton pads! Love the tutorial, gonna make one myself :)
Nath: You're most welcome! :)
saltvinegar: Yay for DIY stuff that works as well as overpriced stuff! XD
Jothi: Haha, glad to be of help! After you start using this dip, you'll never want to use cotton pads again (unless it's for pedicures, lol).
I didn't know that!!! you are my life saver!!! =DDDD
Nicole: Hehehe, glad to be of help!
Post a Comment